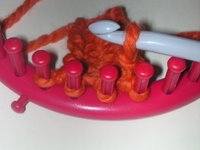
Go to LoomKnittingDesigns.com in the "Instructions" section and download the PDF or see below for some step by step instructions on binding off a flat panel of knitting from a single rake (like the knifty knitters!):
Materials Needed:
- Any knitting loom used as a single rake. Here I use a red Knifty Knitter loom.
- Lion Brand Thick N’ Quick – or similar Super Bulky Weight yarn for practice
- Knifty Knitter yarn pick
- Large Crochet Hook (about the diameter of a pencil)
- Scissors
For the purpose of these instructions, I cast on to 5 pegs across using the Knifty Knitter red loom and knit a total of 5 rows before beginning the bind off instructions below. If you are practicing, I’d recommend having at least 5 rows of knitting on your loom before binding off. Any less then this and your knitting might be a little tough to maneuver.
 Step 1:
You have your panel of knitting and you are ready to stop knitting. Since I’m right handed, I like to end on the right side away from the thumb tack if possible. If you are a lefty, it might be easier to end on the left side next to the thumbtack.
 Step 2:
Pick up the first loop from the first peg and place it on your crochet hook.
TIP: It may be easier to grab the loop with your fingers.
 Step 3:
Without cutting the working yarn, lay the working yarn across the end of your crochet hook between the loop you placed on in step 2 and the hook end.
 Step 4:
Now pull a loop of working yarn through the loop from the loom. The loop from step 2 should now be off your crochet hook and you should be left with one loop of working yarn.
 Step 5:
Now pick up another loop from the loom from the adjacent peg. If you are a righty, it’ll be the next peg to the left. If you are a lefty, it’ll be the next peg to the right.
Place this loop on your crochet hook just as you did in step 2
 Step 6:
Then pull the loop you just placed on your hook from the loom through the loop you made in step 4.
You should now be left with one loop of yarn on your hook.
Repeat:
Now repeat steps 3-6 above until you get all the loops off your loom.
Now repeat steps 3-6 above until you get all the loops off your loom.
 Final steps:
To end the last loop, cut the working yarn leaving a 6 inch tail. Then wrap the end of your crochet hook with a loop of working yarn. Just as you did in step 4, pull a loop of working through the last loop.
 Now pull the 6 inch tail all the way through that last loop. Give that tail a little tug after it’s through to tighten that last stitch.
Weave in this tail using a yarn needle.


No comments:
Post a Comment