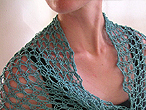
 I got a question in my loom knitting inbox this morning asking "what is a flat panel". The person was interested in my Lacey Shrug (on the left) but was unsure of the flat panel technique this pattern uses.
My explanation was ok (I think) until I tried to explain the turning around part of the process. In the instructions here I want to show the u-turn in all its glory. This is a simple technique and the key to creating a flat panel on a knitting loom.
Before we begin, a little setup here...these instructions are for beginners and will show how to do a u-turn while working an e-wrap panel. You can view any of the images larger by clicking on them. It is also assumed that you are working from left to right and then back in the opposite direction from right to left.
Step #1: Cast on to your loom however many stitches the pattern requires. Just for example sake, let's say you are making a scarf and it's 20 pegs wide. Cast on using the e-wrap stitch across to 20 pegs. This can be on any loom as long as you are using it as a single rake (one single row of pegs). Wrap every peg until you get to peg 20. Then stop!
 Step #2: You are on peg 20 and your yarn is hanging out the right side of the peg.
 Step #3: To do a u-turn from an e-wrap to another e-wrap stitch in the opposite direction, pull the working yarn back across the top (above the loop) and across the outside of the peg. DO NOT wrap it all the way around peg 20 as you did right before you stopped. Here you are only laying it across the front of the peg. See the picture....
 Step #4 Then start e-wrapping back in the opposite direction. You will now be e-wrapping counterclockwise around the pegs and wrapping pegs 19 through peg 1 all the way around as you did in the first wrap.
Step #5: Once you get all the way back to peg one, lift all the stitches up and over the pegs just as you do in a normal in-the-round row. All your pegs should have 2 loops on them including peg #20. Although, peg #20 has a small loop on the bottom and a large loop on the top the connects #19 and #20.
 Step #6: Now you are ready to go back across (left to right). This is done in the same way only in the opposite direction. Just as before, pull the working yarn back across the top (above the loop) and across the outside of the peg #1. DO NOT wrap it all the way around. Then e-wrap back across as you did in the cast on row.
I hope these instructions make u-turns easier. Creating a flat panel is pretty easy if you master the u-turn. In the instructions section of LoomKnittingDesigns.com there are instructions on how to bind off a flat panel. Once you get to the end of your scarf project (or whatever flat panel project you choose), these will help get it off the loom.


thanks bunches for adding the info. I did in fact check it out to make sure. Your alot of help and your work is great. Thank you again
ReplyDeleteGayle
You are my HERO for giving instructions on the U-turn!!! I'm a beginner with the knifty knitter looms and I couldn't for the life of me figure out how to do a flat panel on the long looms. Thank you. :)
ReplyDeleteI know this is an old post...but thanks so much for the U-turn tutorial. It was very helpful to me! :)
ReplyDeleteThanks so much for posting this. I searched YouTube for how-to videos for flat-panel stitches on a knitting board and couldn't find anything as helpful as this blog post.
ReplyDelete